Version -V1 (January 30 2025)
For any query Contact:
- AstroSat CZTI Payload Operation Center/ POC (cztipoc@iucaa.in) (To request for GRB data and simulation files, users are instructed to contact the CZTI POC)
IMPORTANT NOTES :
- The GRB polarimetric analysis can be carried out using IDL (version 7.1.1 and above) or GDL (version 1.0.1 and above). Please note that the time to carry out analysis in GDL is ~2-3 times more than on IDL. (Preferable systems: Any high computational machines/workstations/clusters)
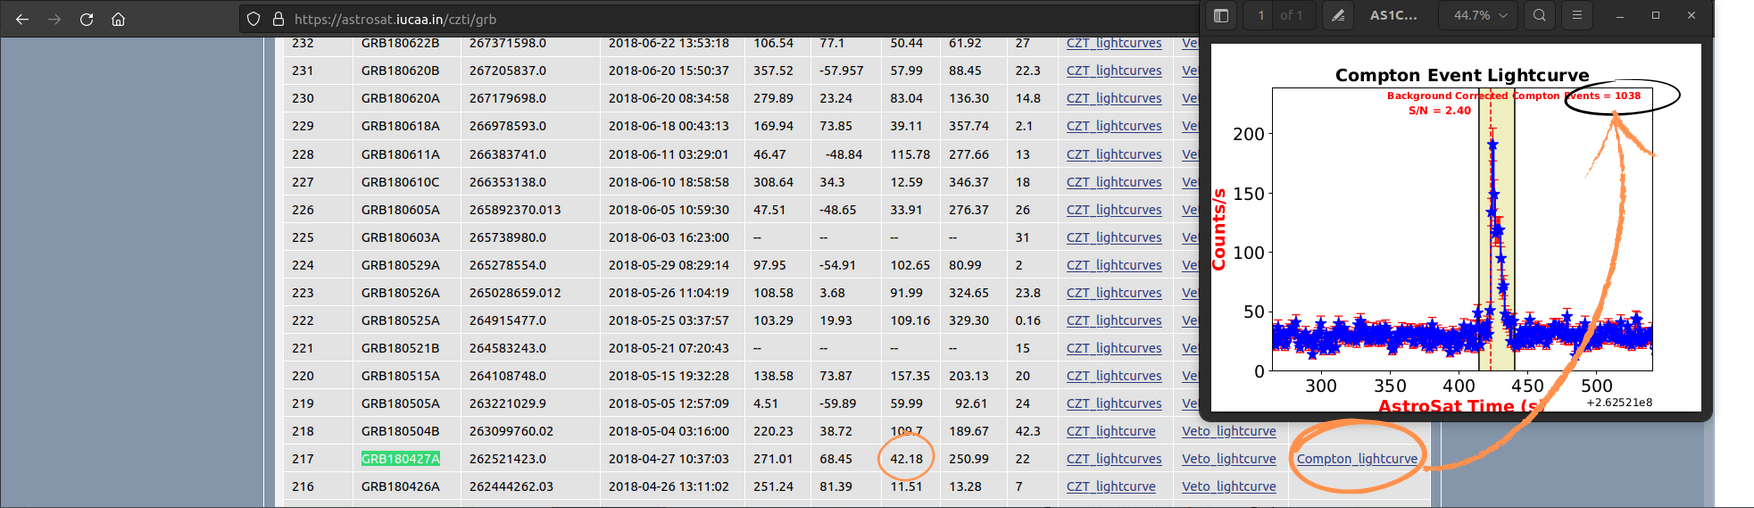
- Any new GRB detection by CZTI along with other details (detection angle (theta), light curves, number of Compton events) are regularly updated in the CZTI GRB Page.
- After checking the viewing angle and MDP criteria (mentioned in the next section) for the GRB, the user can write to the POC for the data and simulation files required to perform polarization analysis.
- Download all the codes and the supporting files (section A and B) from this link.
- Refer to Chattopadhyay 2022 for details of GRB polarization analysis methodology using AstroSat CZTI.
- Prerequisites for python codes: Python 3.7 or greater, NumPy, AstroPy.
- If you use CZTI polarization data/pipelines in your work, please cite the papers listed below at relevant points in your manuscript, and add acknowledgement in the appropriate place.
- AstroSat: Singh el al, 2014
- CZTI: Bhalerao et al, 2017
- CZTI Polarization analysis: Chattopadhyay et al, 2022
Acknowledgement:
This work used data from the Cadmium Zinc Telluride Imager on board AstroSat, provided by the Indian Space Science Data Centre (ISSDC) of the Indian Space Research Organisation (ISRO). We thank the CZTI Payload Operations Center and the AstroSat Science Support Cell for providing the supplementary data and tools for analysis.
GRB Data Availability
Data files for the 20 GRBs mentioned in Table 1 of Chattopadhyay 2022 are readily available and can be provided by POC, if contacted. For polarization analysis of any new GRB (check CZTI GRB Page), users need to submit a one-page proposal to the POC.
GRB Selection Criteria
Criteria to select GRBs for polarization analysis:
- The detection angle (theta) should be <60 degrees from the CZTI Normal or >120 degrees. (Refer to CZTI GRB Page for the detection angle (theta) of the GRB.)
- Required number of Compton events for 40% Minimum Detectable Polarization (MDP) (refer to CZTI GRB Page)
For more information on MDP, refer this link
| Number of compton counts | ||||
|---|---|---|---|---|
| Theta* (<60°/>120°) | 10% MDP | 20% MDP | 30% MDP | 40% MDP |
| 0°/180° | 7094 | 1962 | 986 | 628 |
| 10°/170° | 7650 | 2103 | 1051 | 667 |
| 20°/160° | 7954 | 2180 | 1087 | 688 |
| 30°/150° | 9797 | 2646 | 1300 | 813 |
| 40°/140° | 13737 | 3638 | 1750 | 1075 |
| 50°/130° | 19446 | 5071 | 2395 | 1445 |
| 60°/120° | 46308 | 11795 | 5397 | 3150 |
* Theta values vary by ±5 degrees
EXAMPLE: GRB180427A
- Theta <60 degrees
- Compton counts: 1038 (~40% MDP)
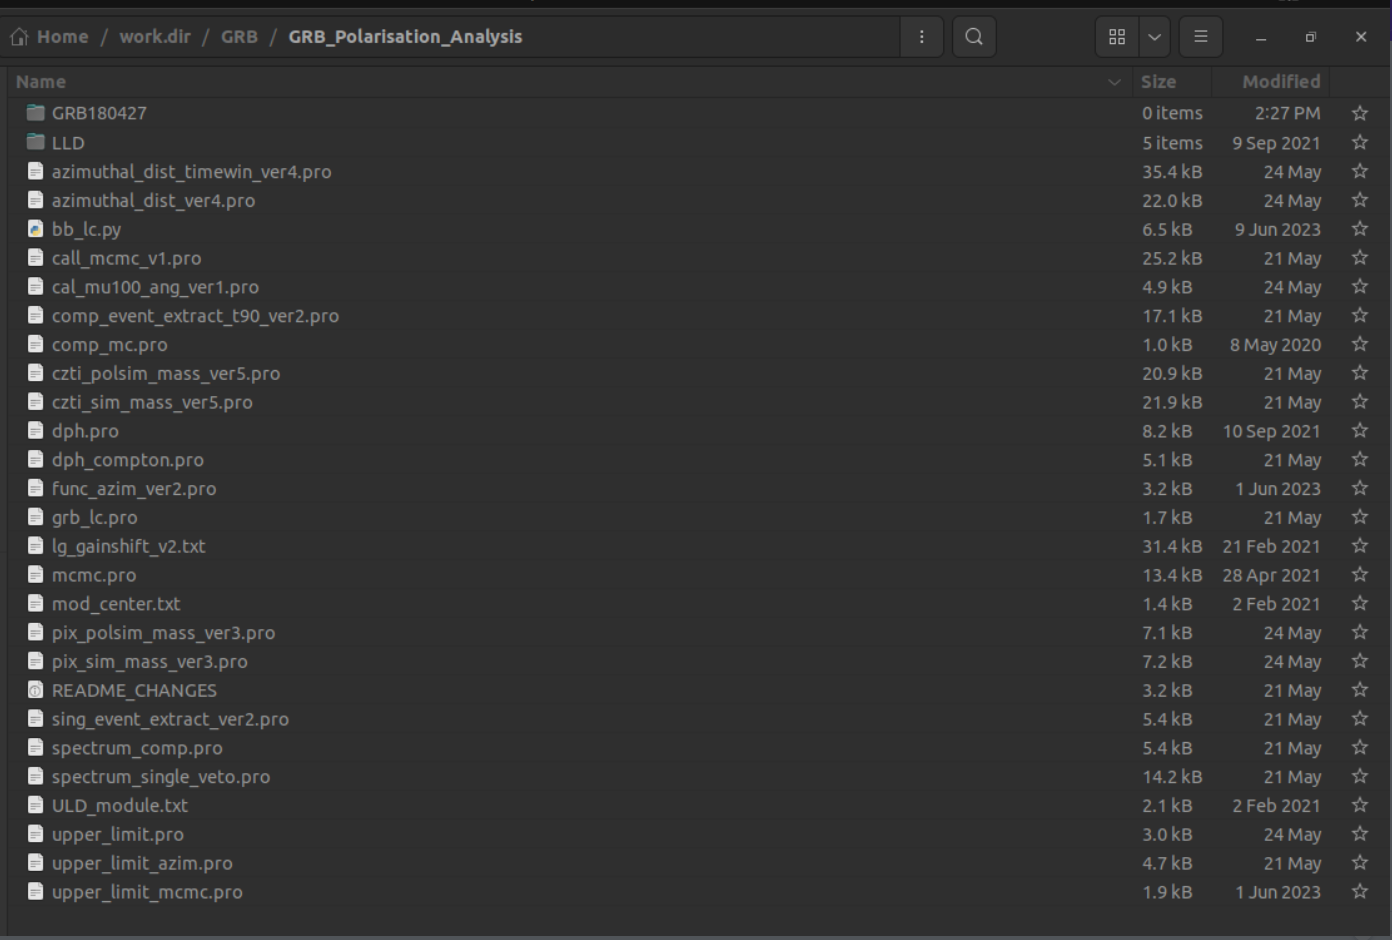
- List of Codes (IDL/GDL and Python)
- doubleEvent_DPH_badpixgen.py
- bb_lc.py
- comp_event_extract_t90.pro
- grb_lc.pro
- sing_event_extract.pro
- pix_sim_mass.pro
- czti_sim_mass.pro
- azimuthal_dist.pro
- comp_mc.pro
- func_azim.pro
- dph_compton.pro
- spectrum_comp.pro
- spectrum_single_veto.pro
- cal_mu100_ang.pro
- call_mcmc.pro
- mcmc.pro
- mpi_upper_limit.pro
- upper_limit.pro
- upper_limit_azim.pro
- upper_limit_mcmc.pro
- upper_limit_plot.py
- List of supporting files
- mod_center.txt
- ULD_module.txt
- LLD (folder) - Inside the "LLD" folder, there are four files LLD_Q0.txt, LLD_Q1.txt, LLD_Q2.txt and LLD_Q3.txt corresponding to the four quadrants of the CZTI.
- lg_gainshift.txt (gain shift value file)
- CALDB file
Files in sections A and B can be downloaded from here.
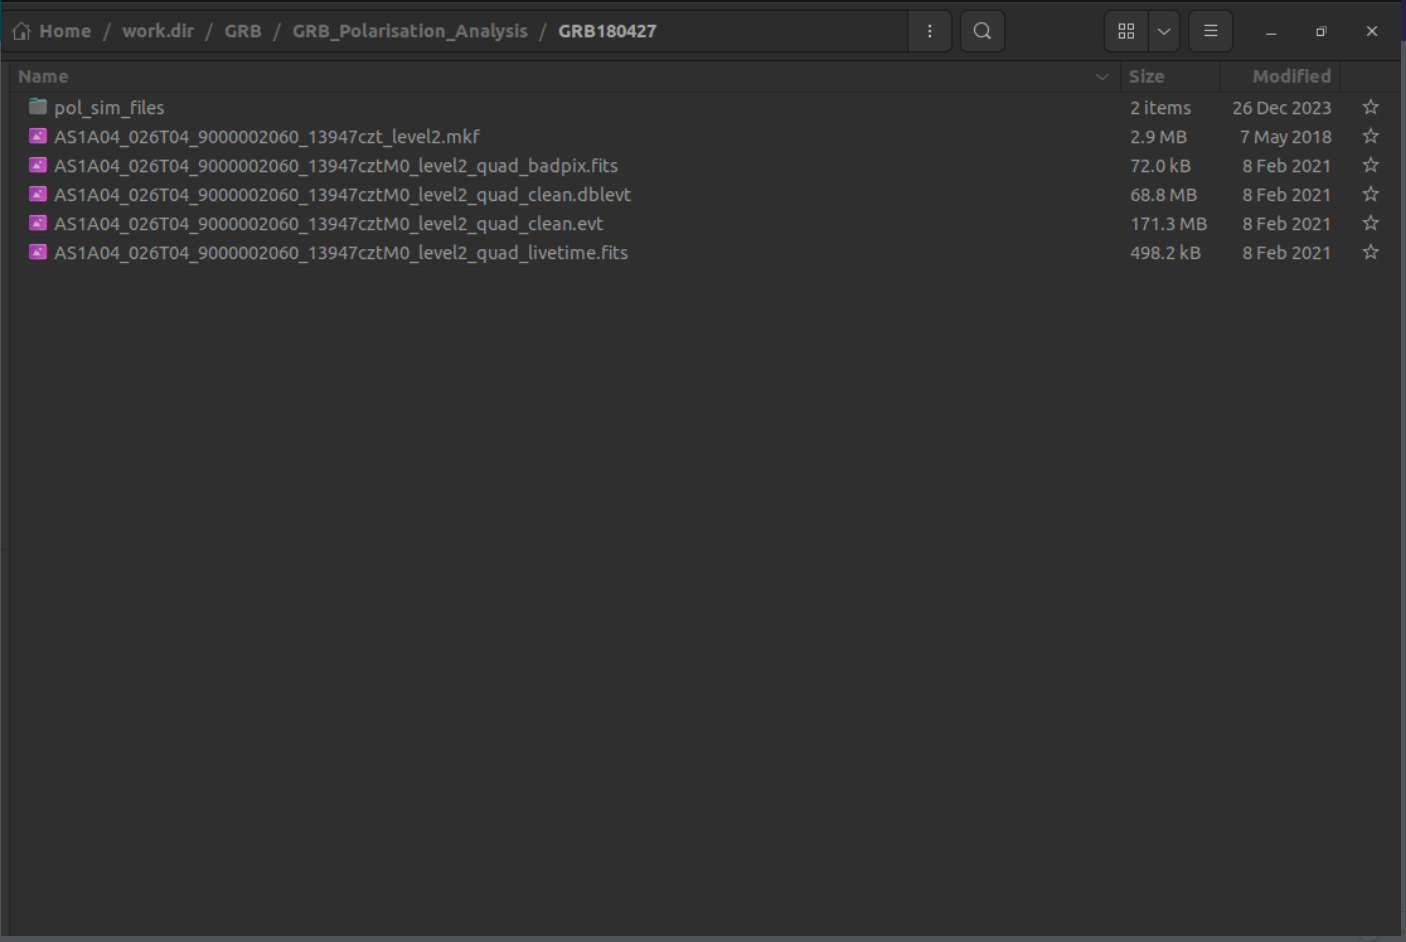
- List of data files (GRB specific, contact POC for files)
- *.dblevt file (for double events)
- *.evt file (for single event)
- *livetime.fits file
- *badpix.fits file
- The unpolarized simulation file - EventFileSimulGRBYYMMDD_mass.txt
- The polarized simulation folder - pol_sim_files (contains simulation of 100% polarized radiation for 19 angles [0-180])
- Setting up the codes and GRB data files
STEP D1:
Install IDL/GDL. Before running the codes, download the following required libraries (see below) and link them to the IDL/GDL.
To install GDL on Windows, use the following links
- https://gnudatalanguage.github.io/gdl.wiki/GDL-on-Windows.html
- https://github.com/gnudatalanguage/gdl/releases
The tar files in the link below contain the set of IDL/GDL library files most commonly used in astronomy. Untar and put the files in the lib folder of IDL/GDL.
For example in the folder: /home/user/Softwares/idl851_linux/idl85/lib
- To locate the IDL/GDL library, one can run locate idl | grep lib
Link for IDL/GDL libraries:
STEP D2:
Make a parent folder "GRB_Polarization_Analysis" and keep all the files mentioned under sections A and B in there.
STEP D3:
Inside the "GRB_Polarization_Analysis" folder, create the GRB folders. Example: GRBYYMMDD (**always use this naming convention**)
STEP D4:
Move the files mentioned in section C to the GRB folder.
STEP D5:
Unzip the files from section C in the GRB folder.
- Selecting Burst Interval for time-integrated polarization
(This code should be run in the polarization analysis directory (i.e. GRB_Polarization_Analysis) where the pipeline codes are downloaded. The output of the code will be generated inside the GRB directory.)
STEP E1:
To select the burst duration of the GRB of interest, use the Bayesian block analysis code:
Code: bb_lc.py
Syntax: python bb_lc.py GRBYYMMDD trigger_time t90
Example: python bb_lc.py GRB180427 262521423.0 22.0
- trigger_time (in AstroSat seconds from CZTI GRB Page)
- t90 from CZTI GRB Page
Argument details:
- sigma: to change the Bayesian binning (default: 7)
- prebkg_start: start value of the pre-background from the burst start value (default: -300.0)
- prebkg_stop: stop value of the pre-background from the burst start value (default: -50.0)
- postbkg_start: start value of the post-background from the burst stop value (default: 50.0)
- postbkg_stop: stop value of the post-background from the burst stop value (default: 300.0)
Note: Try to select at least 100 sec background before and after the burst. Select the background at least 30 seconds away from the burst.
Users can adjust the backgrounds using the arguments given above
Example: python bb_lc.py GRB180427 262521423.0 22.0 --prebkg_start -400.0 --prebkg_stop -30.0 --postbkg_start 30.0 --postbkg_stop 400.0
OUTPUT FILES:
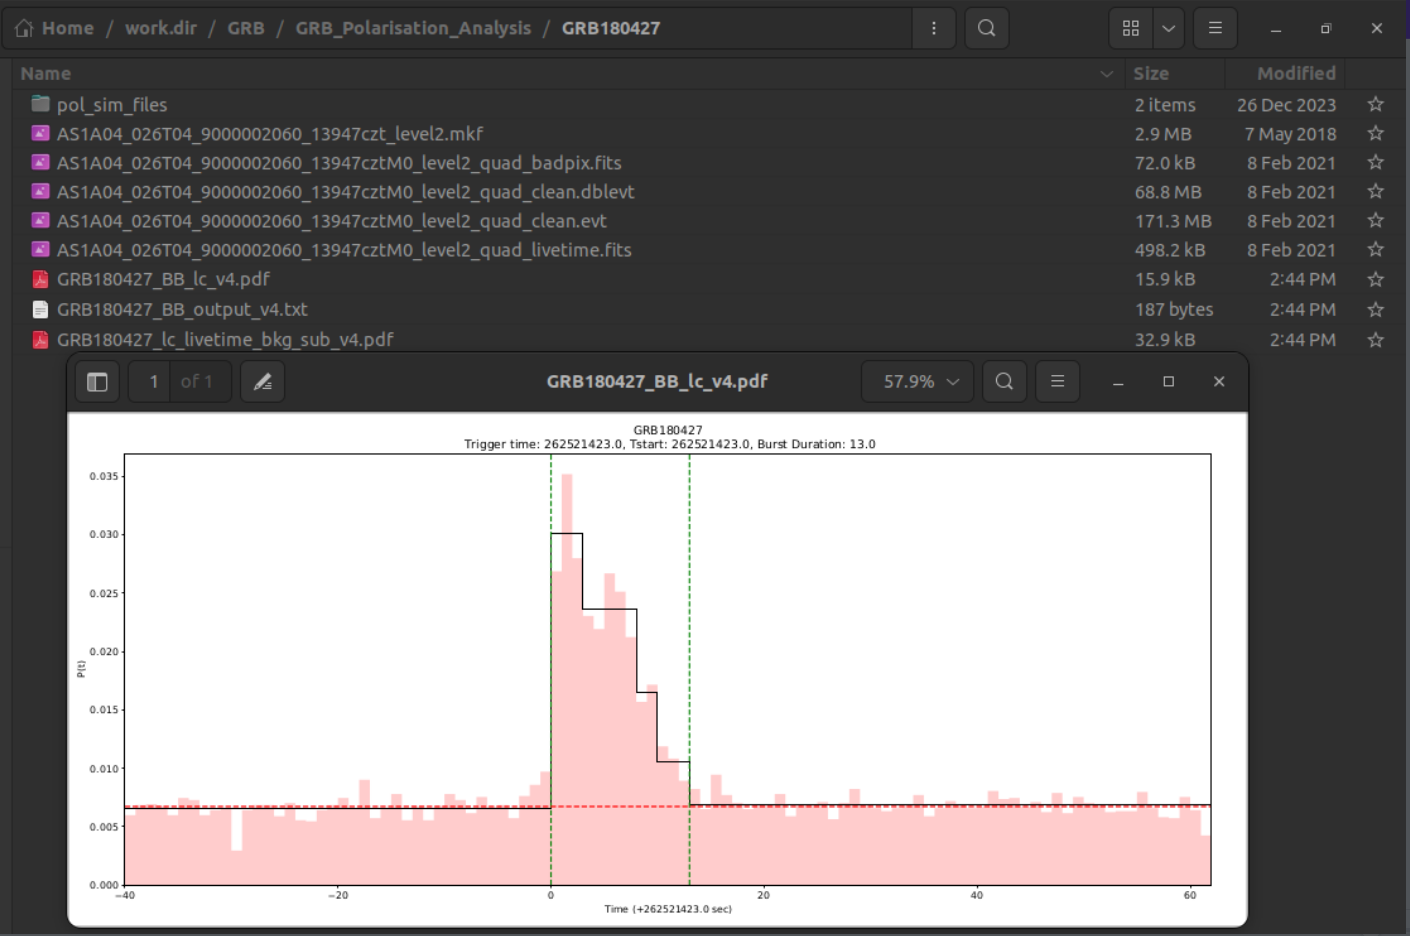
- BB_lc_time_intervals_v1.txt in the polarization analysis directory (Contains: GRBYYMMDD, trigger_time, start_time, burst_duration)
- GRBYYMMDD_BB_lc_v4.pdf in the GRB directory (Bayesian light curve)
- GRBYYMMDD_BB_output_v4.txt in the GRB directory (Bayesian block time stamps, Tstart, Tstop, Tmean, prob_density)
- GRBYYMMDD_lc_livetime_bkg_sub_v4.pdf in the GRB directory (livetime corrected and background subtracted light curve)
- Polarization Analysis Steps
(All the codes should be run at the polarization analysis directory where the pipeline codes are downloaded. The output of all the codes will be stored in the GRB directory.)
STEP F1:
To create the badpix file after Compton noise correction
Code: doubleEvent_DPH_badpixgen.py
Syntax: python doubleEvent_DPH_badpixgen.py --indir GRBYYMMDD --outdir GRBYYMMDD --doubleEventfile AS*.dblevt --badpixfile AS*badpix.fits
Example: python doubleEvent_DPH_badpixgen.py --indir GRB180427 --outdir GRB180427 --doubleEventfile AS1A04_026T04_9000002060_13947cztM0_level2_quad_clean.dblevt --badpixfile AS1A04_026T04_9000002060_13947cztM0_level2_quad_badpix.fits
Argument details:
- indir: Path to the input directory (GRB folder)(Default: none)
- doubleEventfile: Name of the cleaned double event file (*quad_clean.dblevt)(Default: none)
- badpixfile: Name of the badpix file (*quad_badpix.fits)(Default: none)
- caldb_path: Path to the CALDB bcf folder (Default is './support_files/')
- caldb_badpixfilename: CALDB badpix file name (eg: AS1cztbadpix20160908v01.fits default: AS1cztbadpix20160908v01.fits, note: Try to use the latest CALDB files or the ones closer to the observation )
- outdir: Path to the output directory (Default: none, choose the GRBYYMMDD folder)
- sigma_good: Sigma for DPH flagging for good pixels in double events (Default: 4)
- sigma_banana: Sigma for the DPH flagging for low gain pixels in the double events (Default: 3)
OUTPUT FILES:
- badpixlist_Q0.txt
- badpixlist_Q1.txt
- badpixlist_Q2.txt
- badpixlist_Q3.txt
Note: Before running any IDL/GDL code, compile them using the command on the IDL/GDL terminal by:
syntax: .com code_name
Example: .com comp_event_extract_t90.pro
STEP F2:
To extract the Compton and non-Compton events in the GRB duration based on the Compton criteria for the detector
Code: comp_event_extract_t90.pro
Syntax: comp_event_extract_t90,path
Example: comp_event_extract_t90,'./GRB180427/'
Argument Details:
- path: GRB path which contains the preliminary files (format is './GRBYYMMDD/')
Steps to follow:
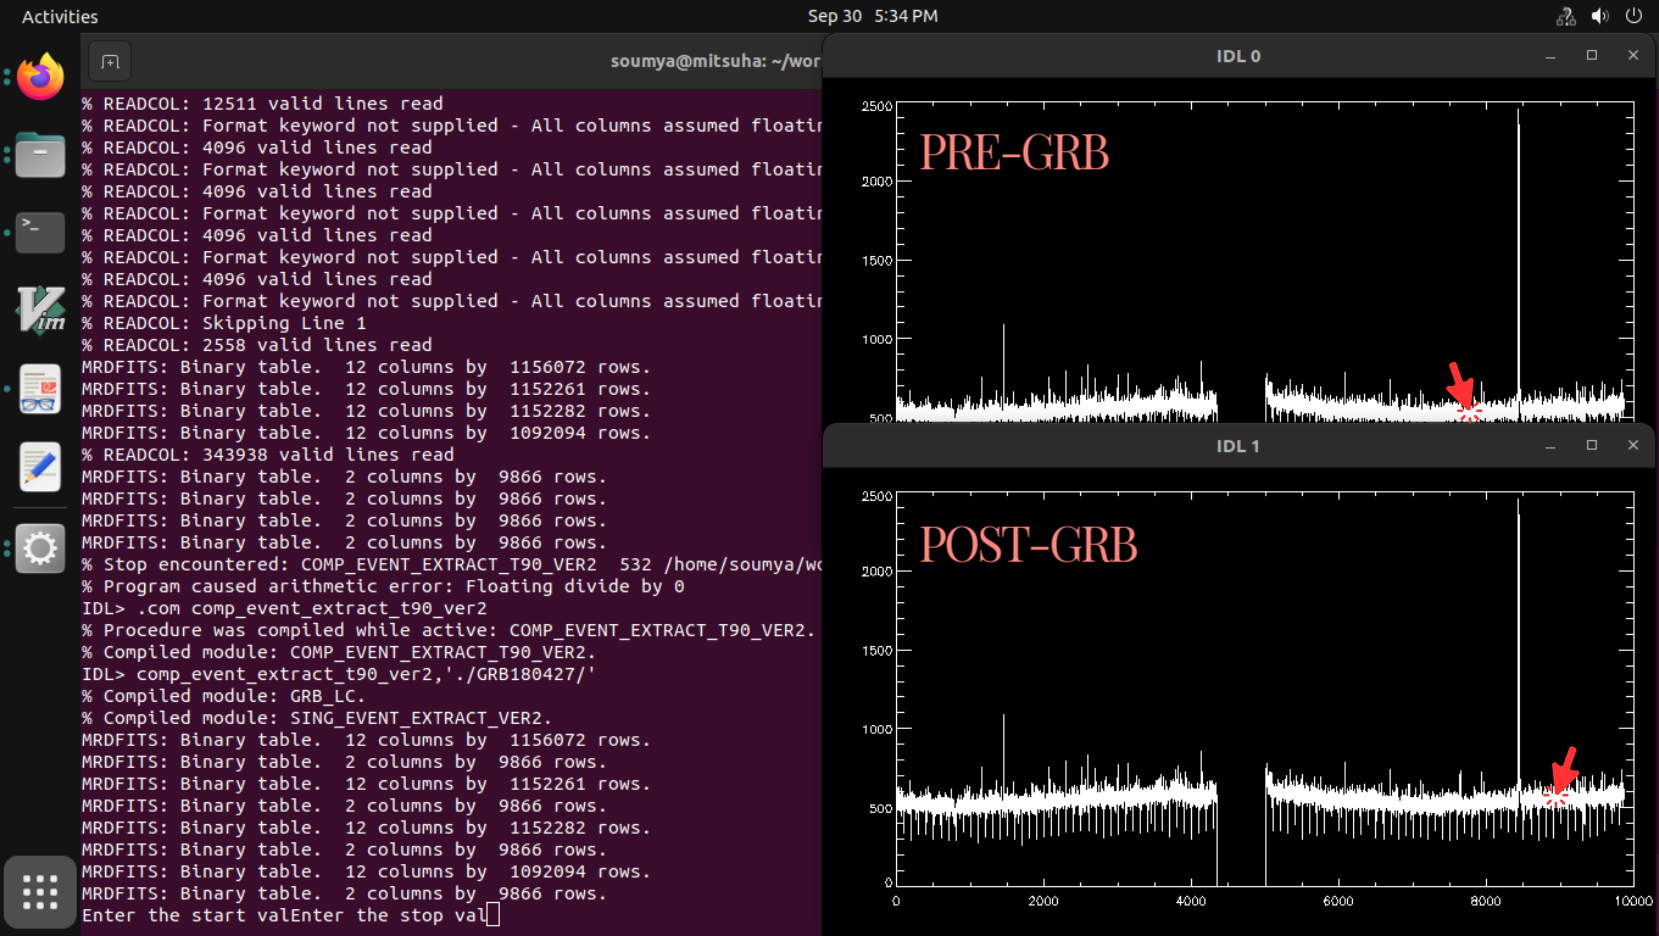
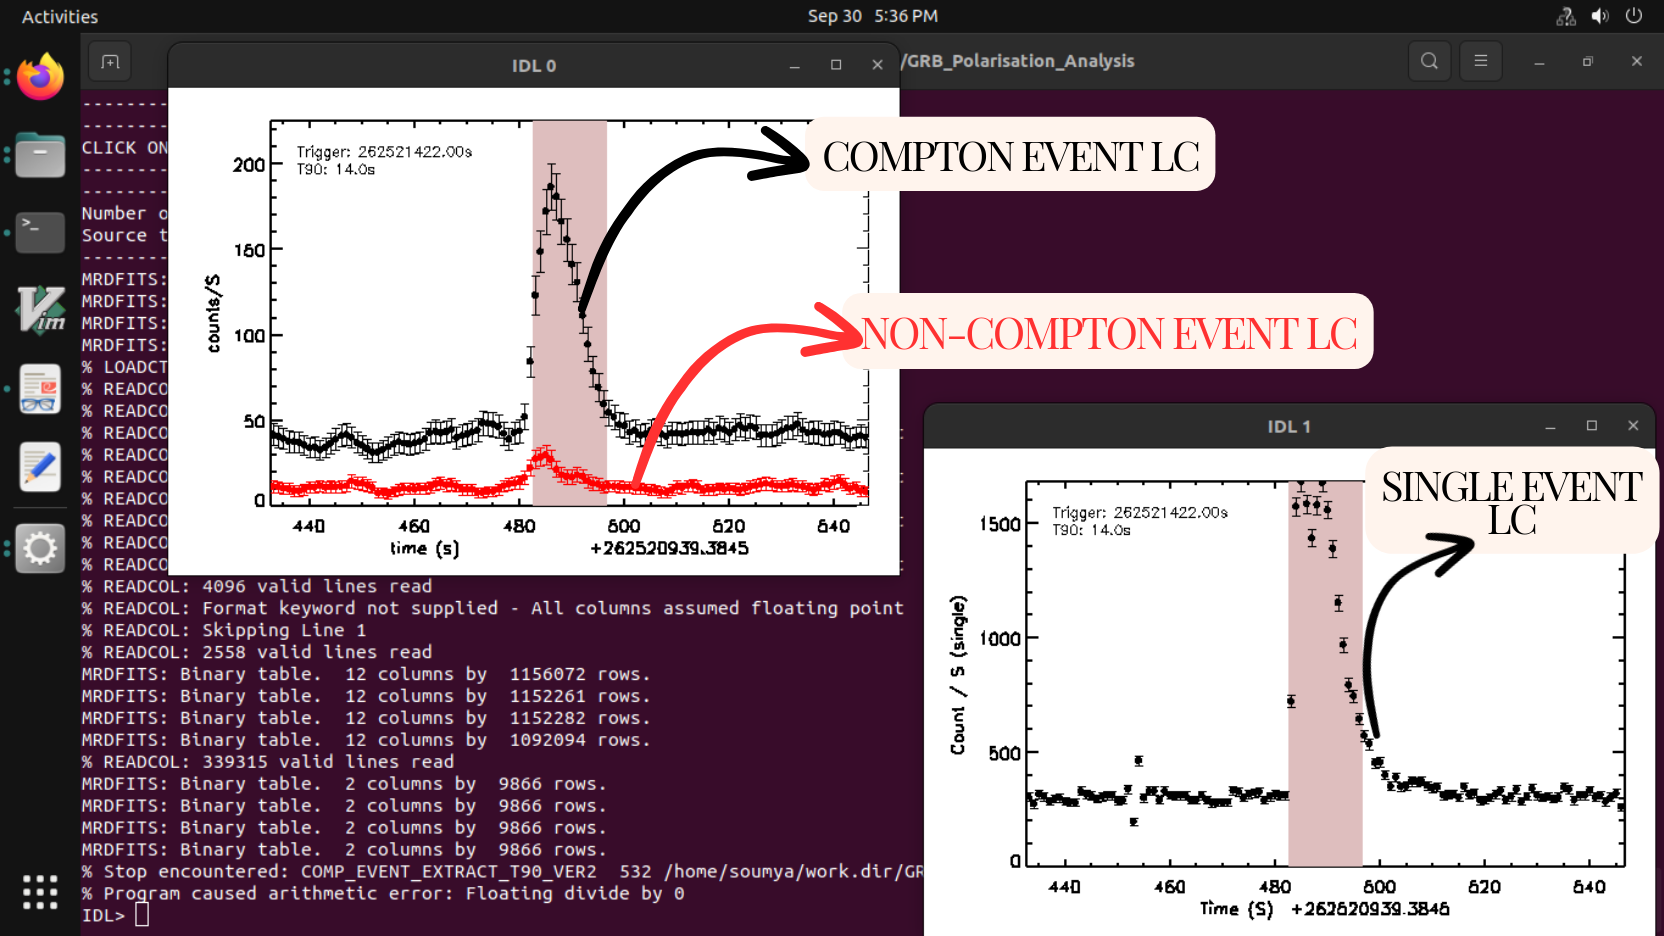
- Two plot windows of the light curve of the complete observation containing the GRB will appear. Use the cursor to select the zoom version of the burst region. Make sure to click well before and after the GRB so that pre and post background can be seen (note: select around 500 seconds before and after the burst region such that ample duration of the background is present for the selection analysis).
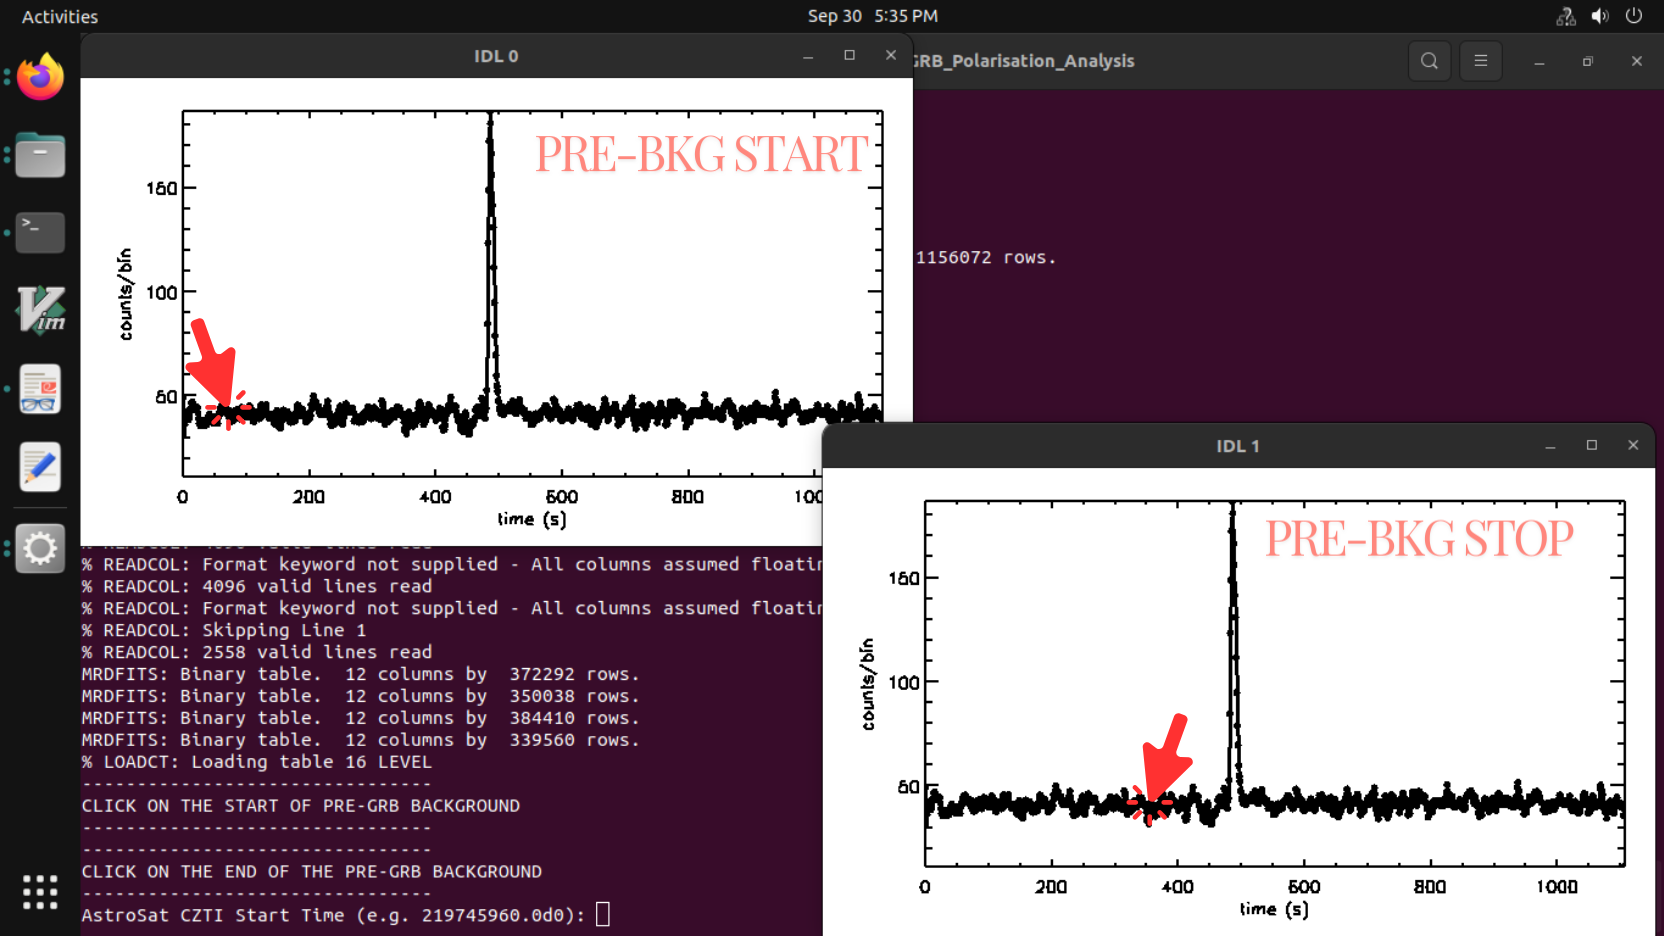
- Pre-Background Duration Selection
- Two windows will pop up successively. The IDL/GDL terminal asks the user to use the cursor to click in the current plot window to select the pre-background start and stop time sequentially (note: try to choose a stable background around 300 sec. Avoid the background too close to the burst's start time (a gap of 50s is advisable). Do not select the high background region close to the SAA region, if the GRB happened to be close to the SAA).
- GRB Duration Selection
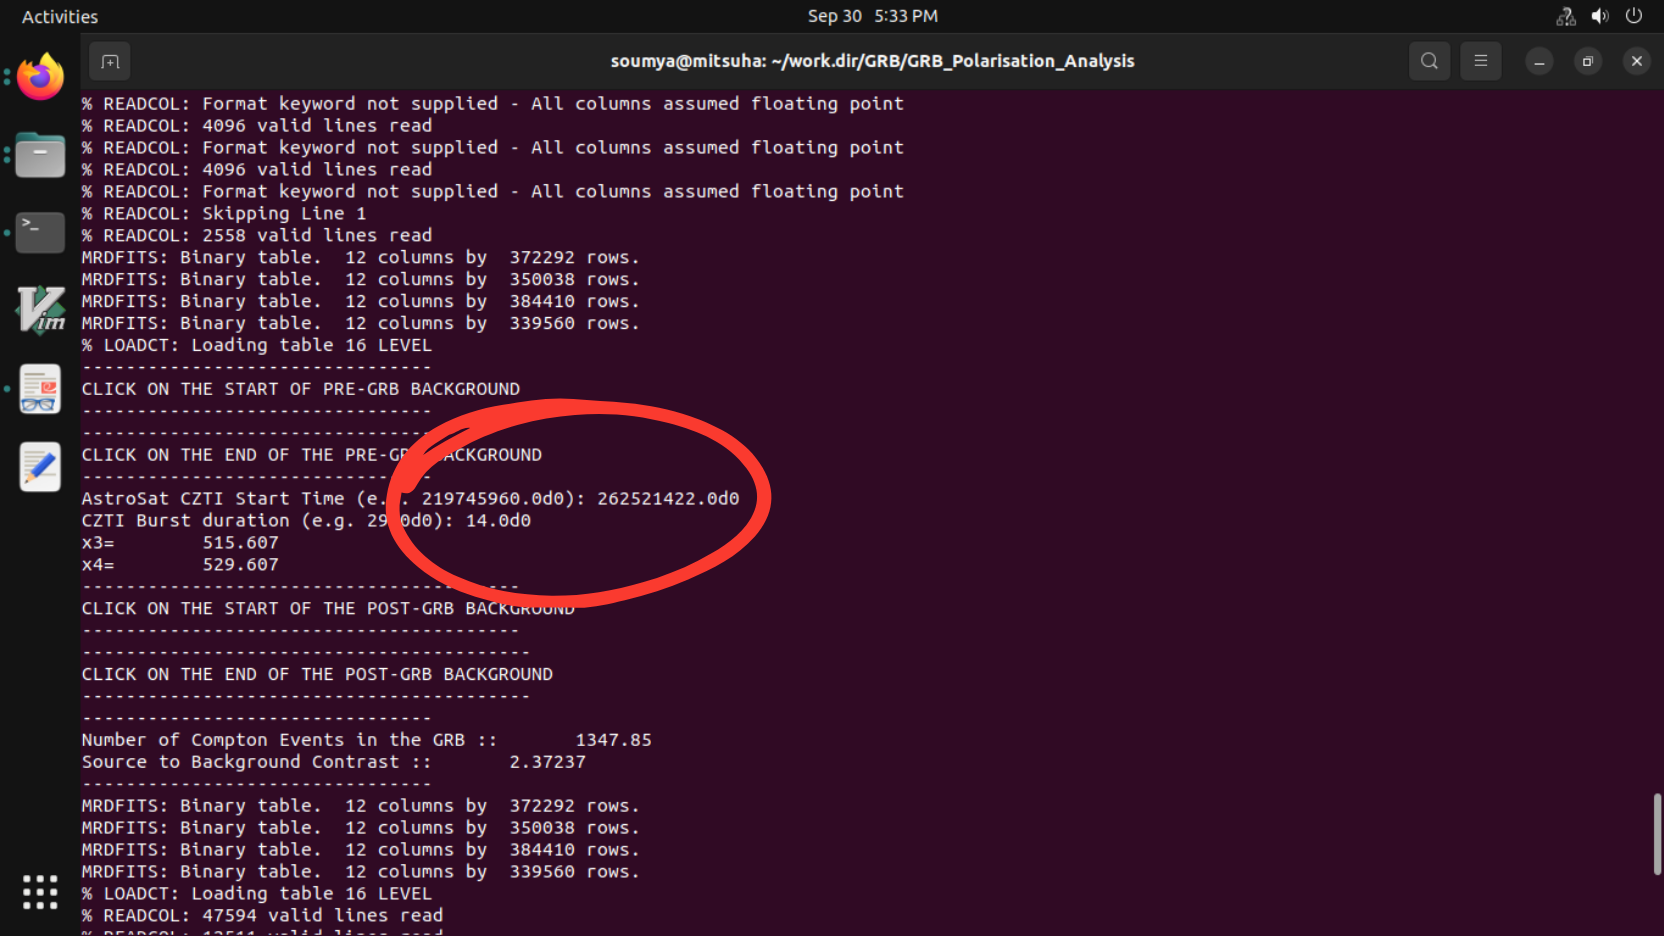
- The terminal will ask for the burst start time (in AstroSat Seconds example: 219745960.0d0):”, write it in “*********.d0” where d0 is for precision. The terminal will ask for “Burst Duration" (e.g. 29.0d0)
Note:- Provide the start time and burst duration from the output file generated from the bb_lc.py (BB_lc_time_intervals_v1.txt)
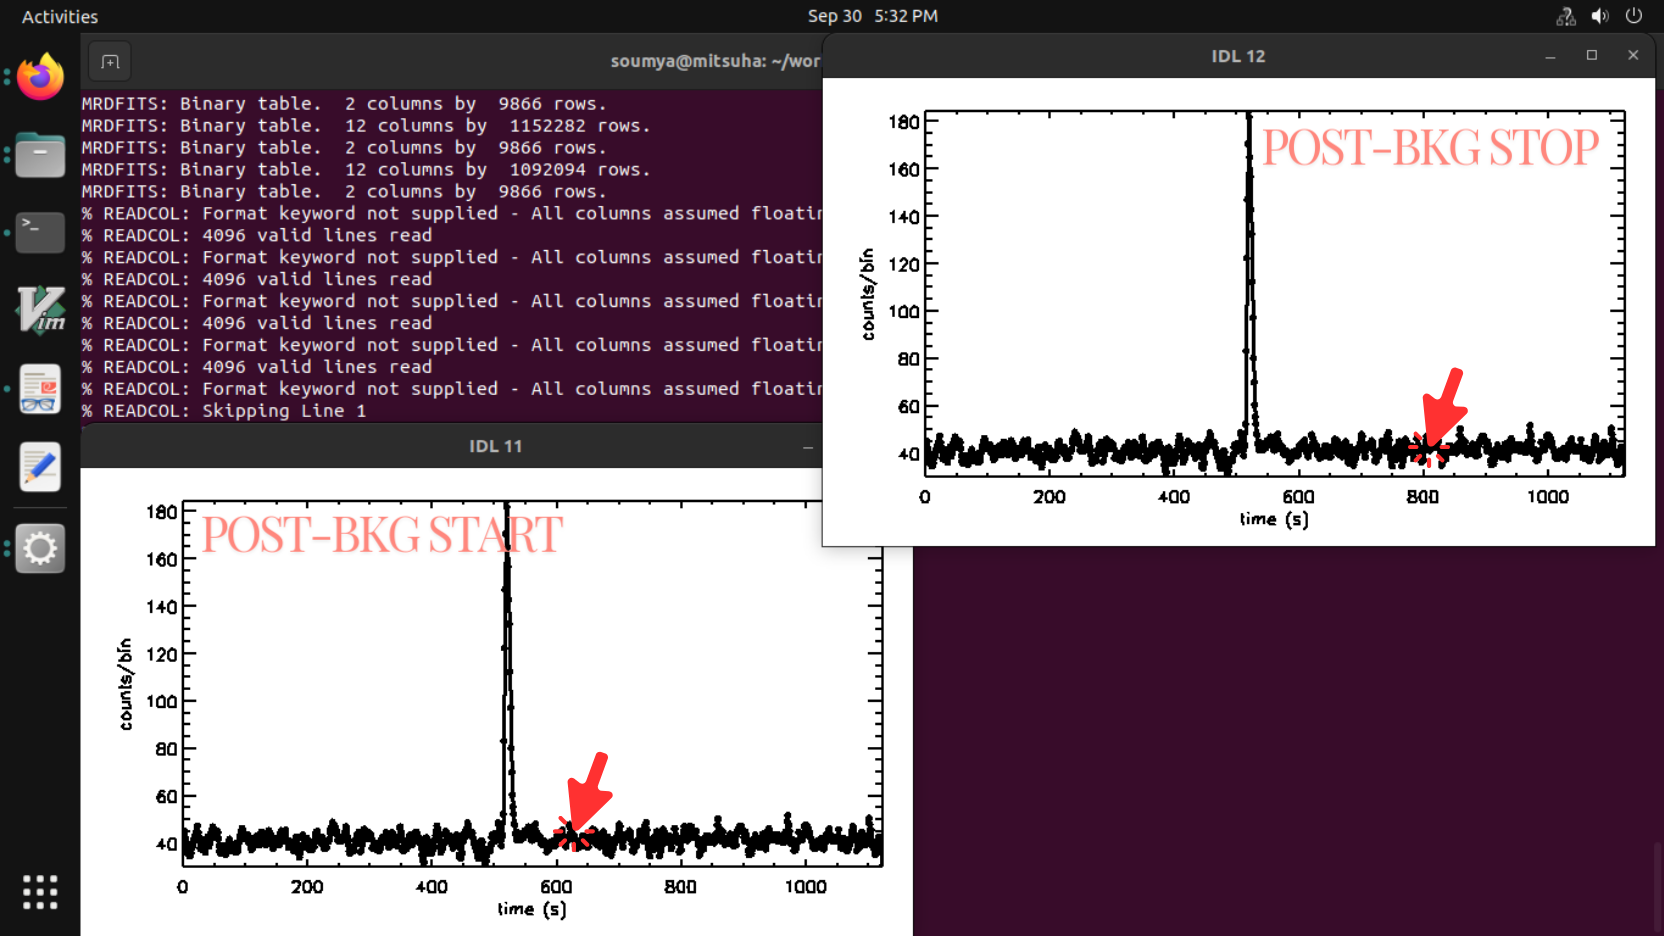
- Post Background Selection
- Two windows will pop up successively. The IDL/GDL terminal asks the user to use the cursor to click in the current plot window to select the post background’s start and stop time sequentially (note: try to choose a stable background around 300 sec. Avoid the background too close to the burst end time, (a gap of 50s is advisable). Do not select the SAA region).
- Ensure the output files mentioned below are generated inside the respective GRB folder.
OUTPUT FILES:
Single event and double event light curve, single event and double event files based on the polarization selection criteria.
- lc_grb_single.png
- time_grb_bkg_sn.txt
- Tmp_GRB_NonComptonEventFile.dat
- Tmp_GRB_ComptonEventFile.dat
- lc_grb_compton.ps
- EventFile_GRB.idl
- Tmp_GRB_SingleEventFile.dat
- lc_grb_single.ps
- EventFile_GRB_Single.idl
STEP F3:
Simulation data processing
Code: pix_sim_mass.pro
Syntax: pix_sim_mass,path
Example: pix_sim_mass,'./GRB180427/'
Argument Details:
- path: Path to directory containing preliminary files (format is './GRBYYMMDD/')
OUTPUT FILES:
- EventFileSimulGRBYYMMDD_mass.txt.ver2.dat
STEP F4:
Code: czti_sim_mass.pro
Syntax: czti_sim_mass,threshold,lowEne,highEne,path
Example: czti_sim_mass,20,100,600,'./GRB180427/'
Argument Details:
- threshold: pixel threshold energy (default: 20)
- lowEne: Low energy in keV for the analysis (100<lowEne<highEne)
- highEne: High energy in keV for the analysis (highEne<600)
- path: Path to directory containing preliminary files (format is './GRBYYMMDD/')
Note: Keep the low energy and high energy values same for the whole analysis hereafter.
OUTPUT FILES:
- Input_CompDPH_sim.txt
- EventFileSimulGRBYYMMDD_mass.txt.ver2.dat_angle_lowEne_highEne_thr_threshold.eps
- EventFileSimulGRBYYMMDD_mass.txt.ver2.dat_spectra_lowEne_highEne_thr_threshold.eps
- EventFileSimulGRBYYMMDD_mass.txt.ver2.dat_spectra_lowEne_highEne_thr_threshold.txt
- hist_EventFileSimulGRBYYMMDD_mass.txt.ver2.dat_lowEne_highEne_thr_threshold.txt
- Angle_dist_EventFileSimulGRBYYMMDD_mass.txt.ver2.dat_lowEne_highEne_thr_threshold.txt
STEP F5:
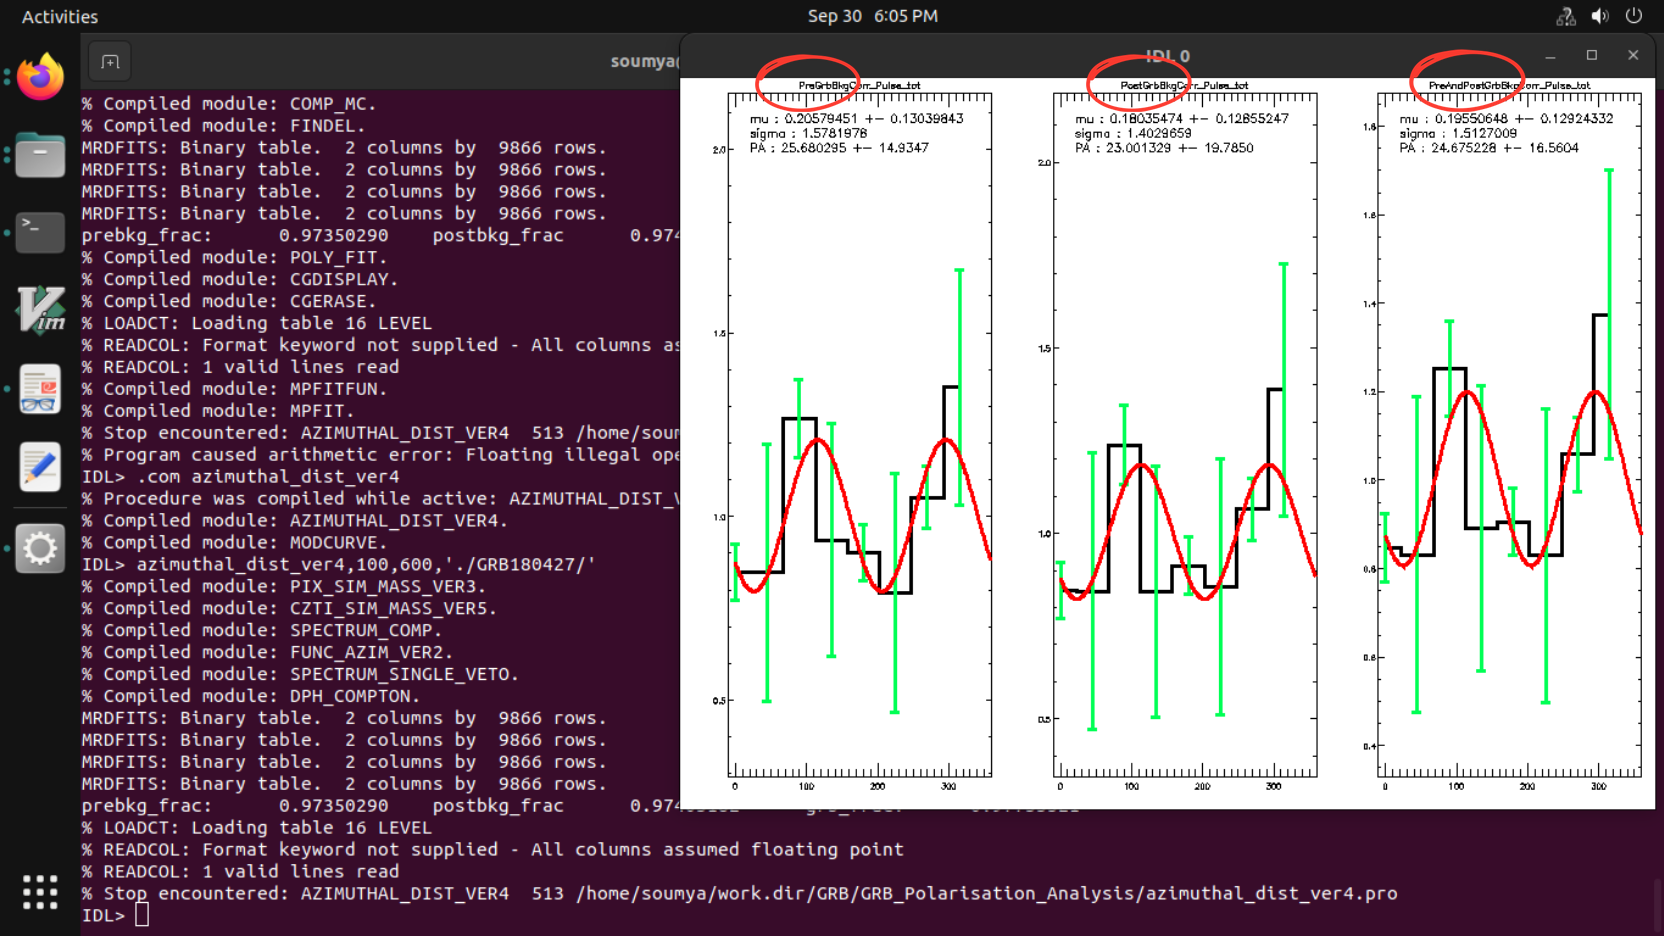
To generate azimuthal distribution file and modulation curve (the uncertainties are computed using chi-square statistics)
Code: azimuthal_dist.pro
Syntax: azimuthal_dist,lowEne,highEne,path
Example: azimuthal_dist,100,600,'./GRB180427/'
Argument Details:
- path: Path to directory containing preliminary files (format is './GRBYYMMDD/')
- lowEne: Low energy in keV for the analysis (100<lowEne<highEne)
- highEne: High energy in keV for the analysis (highEne<600)
OUTPUT FILES:
Simulation products, azimuthal distribution plots, azimuthal distribution files, GRB results-info file, spectrum plots, spectrum files
- module_cnt_comparison_lowEne_highEne.eps
- light_curve_compton_lowEne_highEne_thr_20.txt
- light_curve_compton_lowEne_highEne_thr_20.ps
- light_curve_compton_bkg_lowEne_highEne_thr_20.ps
- Info_YYMMDD_lowEne_highEne_thr_20_pre_postbkg.txt
- Raw_Azimuthal_Distribution_YYMMDD_lowEne_highEne_thr_20_PulseAll_bkg.txt
- Raw_Azimuthal_Distribution_YYMMDD_lowEne_highEne_thr_20_bkg_only.txt
- Raw_Azimuthal_Distribution_lowEne_highEne_thr_20.ps
- Corrected_Azimuthal_Distribution_lowEne_highEne_thr_20.ps
- final_datapoints_YYMMDD_lowEne_highEne_thr_20_PulseAll.txt
STEP F6:
To generate a mu100 file from the simulations containing an array of mu100 values and detector co-ordinate polarization angles.
Code: cal_mu100_ang.pro
Syntax: cal_mu100_ang,low_Ene, highEne, path
Example: cal_mu100_ang,100,600,'./GRB180427/'
Argument Details:
- path: Path to directory containing preliminary files (format is './GRBYYMMDD/')
- lowEne: Low energy in keV for the analysis (100<lowEne<highEne)
- highEne: High energy in keV for the analysis (highEne<600)
OUTPUT FILE:
- mu100_angle_lowEne_highEne_thr_20.txt
(new files will be generated in the "pol_sim_files" folder - *.txt.ver2.dat ... 19 such files and *hist*.txt.ver2.dat ... 19 such files)
Note:If the code stops at any particular angle, recompile the code and run it again
STEP F7:
To generate the Bayes factor and the posterior distribution of the polarization parameters
Code: call_mcmc.pro
Syntax: call_mcmc,path,/bayes_therm,lowEne,highEne,background,Trigger_time
Example: call_mcmc,'./GRB180427/',/bayes_therm,100,600,'prepost',262521423.0d0
Argument Details:
- path: Path to directory containing preliminary files (format is './GRBYYMMDD/')
- lowEne: Low energy in keV for the analysis (100<lowEne<highEne)
- highEne: High energy in keV for the analysis (highEne<600)
- background: The background subtracted modulation file you want to use ('pre'/'post'/'prepost'). The default should be 'prepost', but if the GRB lies close to SAA you can use either 'pre' or 'post'.
- Trigger_time: trigger_time in AstroSat seconds from CZTI GRB Page
OUTPUT FILES:
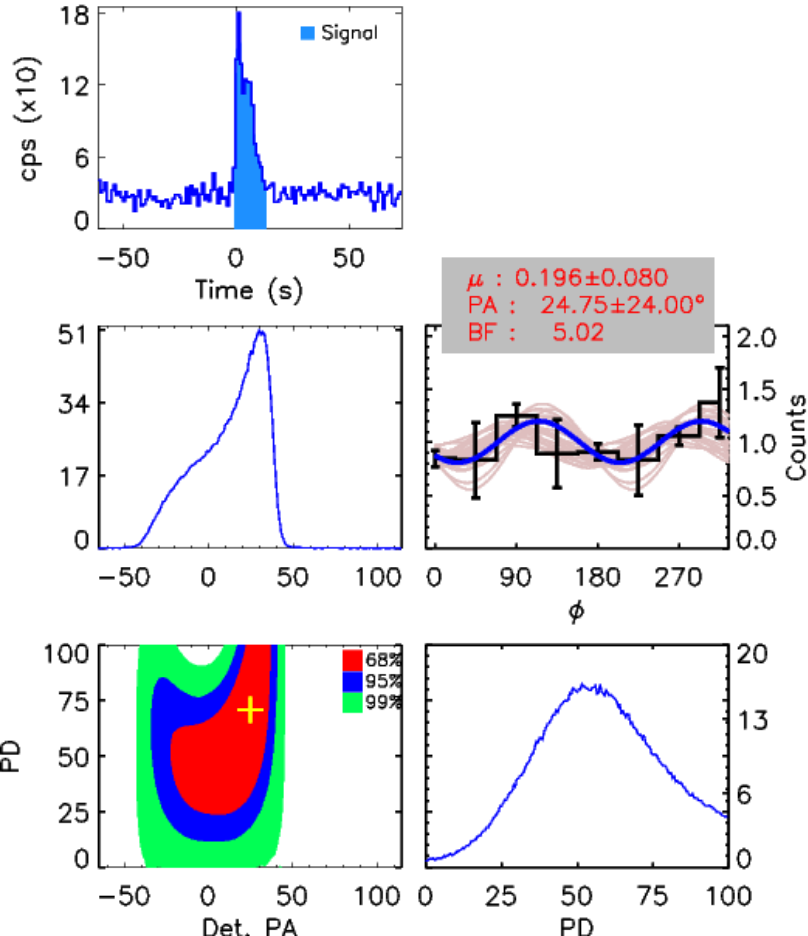
- par_prob_dist_datapoints_YYMMDD_lowEne_highEne_thr_20_PulseAll.txt_background.ps
- par_iter_datapoints_YYMMDD_lowEne_highEne_thr_20_PulseAll.txt_background.ps
- modulation_curve_datapoints_YYMMDD_lowEne_highEne_thr_20_PulseAll.txt_background.ps
- Modulation_Fit_error_datapoints_YYMMDD_lowEne_highEne_thr_20_PulseAll.txt_background
- contour_pol_datapoints_YYMMDD_lowEne_highEne_thr_20_PulseAll.txt_background.ps
- parameters_plot_datapoints_YYMMDD_lowEne_highEne_thr_20_PulseAll.txt_background.ps
- fitted_par_lowEne_highEne_thr_20.txt (The final PD, PA, error bars, BF can be found in this text document)
(Note: If the codes compile but don't run, recompile and run again)
According to Chattopadhyay 2022, if Bayes factor >3.2, the burst is polarized else unpolarized. Hence for the unpolarized burst one can calculate the upper limit on PF by following step F8.
*Note:
- This code works on parallel processing of the IDL script (Statistics: 10 hours using 20 CPUs)
- A User can ask POC for the upper limit calculation, if the users do not have access to IDL or high performing machines.
STEP F8:
F8.1 Make changes in the mpi_upper_limit.pro having the following arguments:
upper_limit,lowEne,highEne,path,Compton counts
Example: upper_limit,100,600,'./GRB180427/',1207
Argument Details:
- path: Path to directory containing preliminary files (format is './GRBYYMMDD/')
- lowEne: low energy in keV for the analysis (100<lowEne< highEne)
- highEne: high energy in keV for the analysis (highEne<600)
- Compton counts: The number of compton counts in the burst region (one can get from the ‘Info_YYMMDD_lowEne_highEne_thr_20_pre_postbkg.txt’ file in the GRB directory)
F8.2 Run the command on the terminal: mpirun -np ncpu idl mpi_upper_limit.pro
Example: mpirun -np 20 idl mpi_upper_limit.pro
Argument Details:
- ncpu: The number of CPUs the user is providing for the code (varies for the individual system, to check the number of CPUs for your system, use the lscpu command in the terminal.) This is used to run the code in parallel processing, it takes ~10 hours for 20 CPUs
OUTPUT FILES:
Dist_Bayes_factor_YYMMDD_lowEne_highEne_thr_20_*.txt, ncpu number of files will be generated.
F8.3 Combine thses files into a single file-
Dist_Bayes_factor_YYMMDD_lowEne_highEne_thr_20.txt
- Command: cat Dist*.txt > Dist_Bayes_factor_YYMMDD_lowEne_highEne_thr_20.txt
F8.4 Run the python code upper_limit_plot.py
Syntax: python upper_limit_plot.py GRBYYMMDD --emax highEne --emin lowEne
Example: python upper_limit_plot.py GRB160325 --emax 600 --emin 100
OUTPUT FILES:
- GRBYYMMDD_lowEne_highEne_uppper_limit.png
- Upper_limit_param.txt (PF upper limits for different confidence levels)